The Problem
A prompt injection attack doesn’t need to break anything. It just needs to find a key with more access than it should have.
OpenClaw can read your email, push to GitHub, charge a Stripe card, post to Slack. It can do all of that because it has the keys to do all of that. The default setup doesn’t distinguish between what the agent should touch and what it can touch. Those are very different things.
The attack surface is real. Malicious content in a web page, a document, or a search result can instruct the agent to take actions you never intended. If the agent has your billing key in its environment, a prompt injection can use it. If it has your email API key, it can send on your behalf. A hallucinated tool call can do the same damage as a deliberate one.
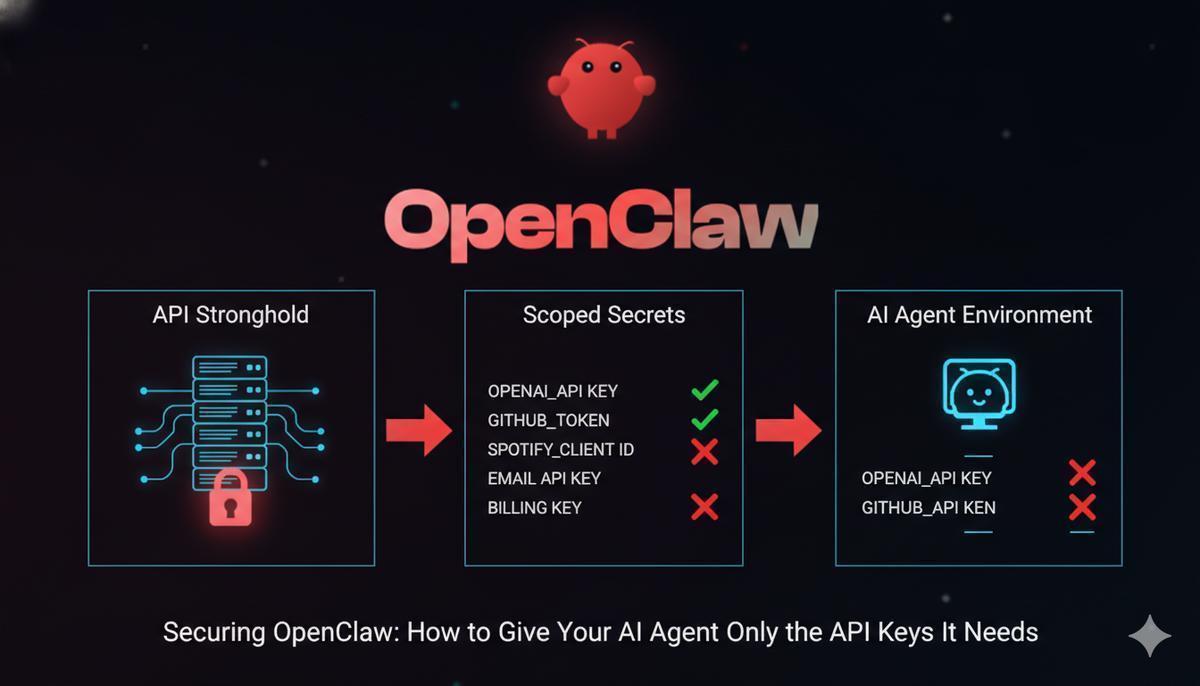
The fix: give the agent only the keys it actually needs, nothing more. No email key if it’s not sending email. No billing key if it’s not processing payments. If a compromised session can only reach three services instead of fifteen, the blast radius is three services.
This guide walks through the setup using API Stronghold to inject scoped, encrypted secrets into an OpenClaw sandbox at runtime. Excluded keys never reach the agent’s environment. They’re filtered server-side before the CLI ever sees them.
What this protects against
- Prompt injection - malicious content in web pages or documents instructs the agent to misuse API keys. Scoped secrets limit the damage to only what the agent actually has.
- Agent errors - if OpenClaw hallucinates a tool call reaching for your email API, it won’t have the key to use.
- Container escape - a compromised container only exposes the scoped keys, not your full credential set.
- Credential sprawl - no
.envfiles duplicated across VMs, no secrets baked into Docker layers, no keys floating in shell history.
The Solution: Scoped Secrets at Runtime
Three pieces fit together here:
- Isolate the agent, run OpenClaw in a VM or container so it can’t reach your host filesystem or other credentials. When running in Docker, OpenClaw uses a dual-container model: the gateway manages AI sessions in one container, while a separate sandbox container executes tools, keeping model credentials and application secrets in separate security boundaries.
- Inject only allowed keys, use API Stronghold’s CLI to pull scoped secrets into the sandbox environment at startup
- Enforce restrictions server-side, key exclusion rules determine which keys the agent’s user account can access
No .env files on disk. No hardcoded credentials in a Docker image. Keys exist only in memory for the duration of the process. (If your team is still passing .env files around, that habit is killing your productivity.)
The core of it is one line in your startup script:
api-stronghold-cli run production -- openclaw startThis authenticates with API Stronghold, decrypts only the keys the user is authorized to access, and injects them as environment variables into the child process. OpenClaw sees them automatically, but nothing persists in the parent shell.
How It Works: The Architecture
Here’s what happens end-to-end:
┌──────────────────────────────────────────────────┐
│                  API Stronghold                   │
│         (zero-knowledge encrypted vault)          │
│                                                   │
│  Deployment Profile: "OpenClaw Agent"             │
│  ┌─────────────────────────────────────────────┐  │
│  │  OPENAI_API_KEY    → mapped                 │  │
│  │  GITHUB_TOKEN      → mapped                 │  │
│  │  SPOTIFY_CLIENT_ID → mapped                 │  │
│  │  EMAIL_API_KEY     → ✗ excluded from group  │  │
│  │  BILLING_KEY       → ✗ excluded from group  │  │
│  └─────────────────────────────────────────────┘  │
└──────────────────────┬───────────────────────────┘
                       │  CLI fetches only
                       │  allowed keys
                       ▼
┌──────────────────────────────────────────────────┐
│  Docker Host                                      │
│                                                   │
│  ┌────────────────────────┐  docker exec          │
│  │  Gateway Container     │────────────┐          │
│  │  (AI model credentials │            │          │
│  │   + session management)│            ▼          │
│  │  No app secrets here   │  ┌─────────────────┐  │
│  └────────────────────────┘  │ Sandbox Container│  │
│            │ docker.sock     │ (app secrets via │  │
│            │                 │  CLI + scoped    │  │
│            ▼                 │  env vars only)  │  │
│  ┌────────────────────┐     │                   │  │
│  │  Docker Daemon      │     │  OPENAI_API_KEY  │  │
│  │  (spawns sandbox    │     │  GITHUB_TOKEN    │  │
│  │   containers)       │     │  SPOTIFY_CLIENT  │  │
│  └────────────────────┘     │  ✗ EMAIL_API_KEY │  │
│                              │  ✗ BILLING_KEY   │  │
│                              └─────────────────┘  │
└──────────────────────────────────────────────────┘
The server enforces key exclusions before the CLI ever sees the key IDs. The excluded keys are never transmitted, never decrypted, and never enter the VM’s memory.
Stop your OpenClaw agent from holding keys it doesn't need
API Stronghold scopes, encrypts, and injects only the keys each agent is authorized to use. Free to start, no card required.
No credit card required
Step-by-Step Setup
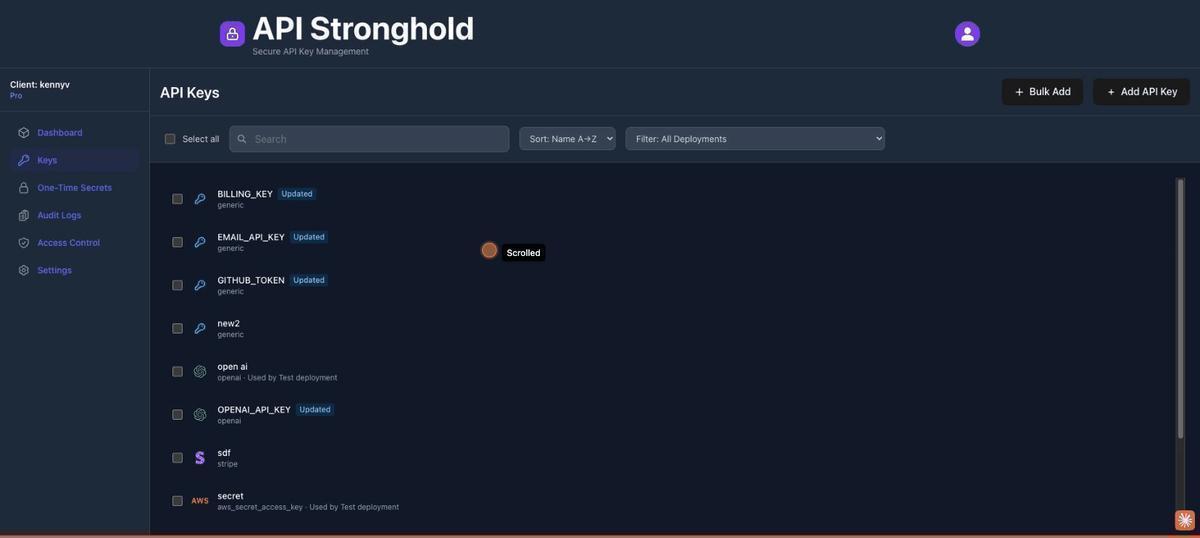
1. Add Your API Keys to API Stronghold
Log into API Stronghold and navigate to the Keys page. Click Add Key and enter the details for each service OpenClaw needs, OpenAI, GitHub, Spotify, etc. Select the provider from the dropdown (Stripe, AWS, GitHub, and others are available), give the key a descriptive name, and paste in the value.
Every key is encrypted client-side with AES-256-GCM before it leaves your browser. The server only ever stores an encrypted blob it cannot decrypt.
Also add the keys you want to protect from the agent, your email API key, billing credentials, and anything else sensitive. These will be excluded in a later step.
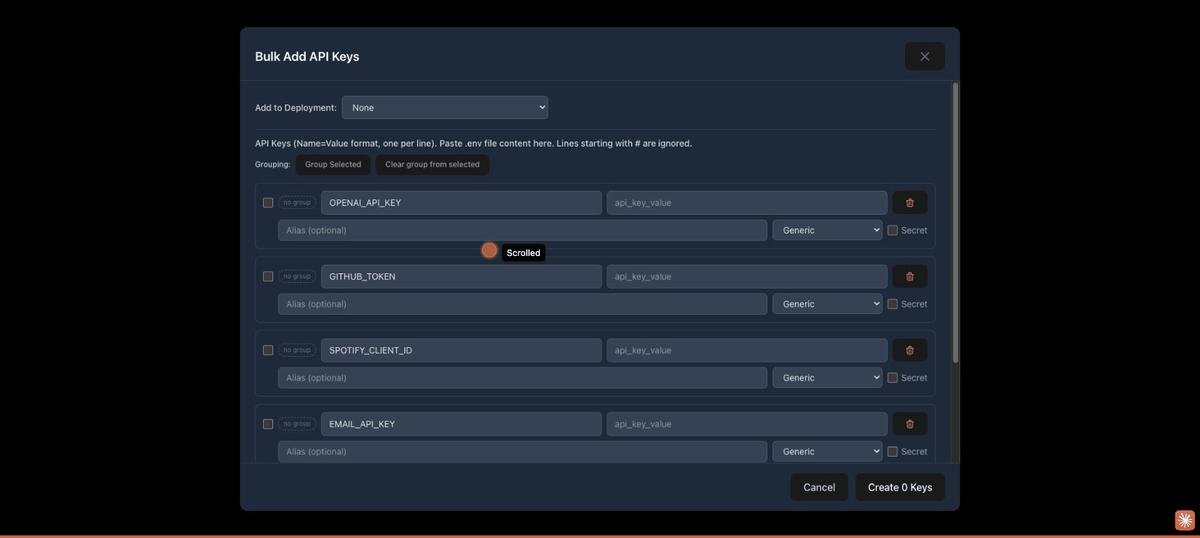
Bulk Add: Import Multiple Keys at Once
If you’re migrating from an existing .env file or setting up a new agent with several services, the Bulk Add feature saves time. Click the green ”+ Bulk Add” button in the top right of the Keys page to open the bulk import modal.
From here you have two options:
Paste a .env file directly. Paste your environment variables in standard KEY=value format (one per line) into any row’s name field. API Stronghold parses the input automatically, comments and export prefixes are stripped, and each variable gets its own row.
# Example .env content you can paste:
OPENAI_API_KEY=sk-proj-abc123...
GITHUB_TOKEN=ghp_xyz789...
SPOTIFY_CLIENT_ID=abc123
EMAIL_API_KEY=SG.sendgrid-key...
BILLING_KEY=sk_live_stripe...
Or add rows manually. Click “Add Row” to create blank entries and fill in each key’s name, value, provider type, and optional alias one by one. You can mark individual keys as secrets and assign a provider (Stripe, AWS, OpenAI, or generic) for each row.
Auto-grouping for AWS credentials. If your .env includes AWS keys, API Stronghold automatically detects matching credential sets (access key + secret key + optional session token) and groups them together. For example, PROD_AWS_ACCESS_KEY_ID and PROD_AWS_SECRET_ACCESS_KEY are grouped as “PROD AWS Credentials”, keeping related keys organized from the start.
You can also manually group keys: select rows using the checkboxes, enter a group name, and click “Group Selected”. Groups carry through to the Keys page, making it easier to manage related credentials.
Click “Create X Keys” to encrypt and store all valid rows at once. Empty rows are skipped automatically. After creation, the keys appear on your Keys page ready to be mapped to a deployment.
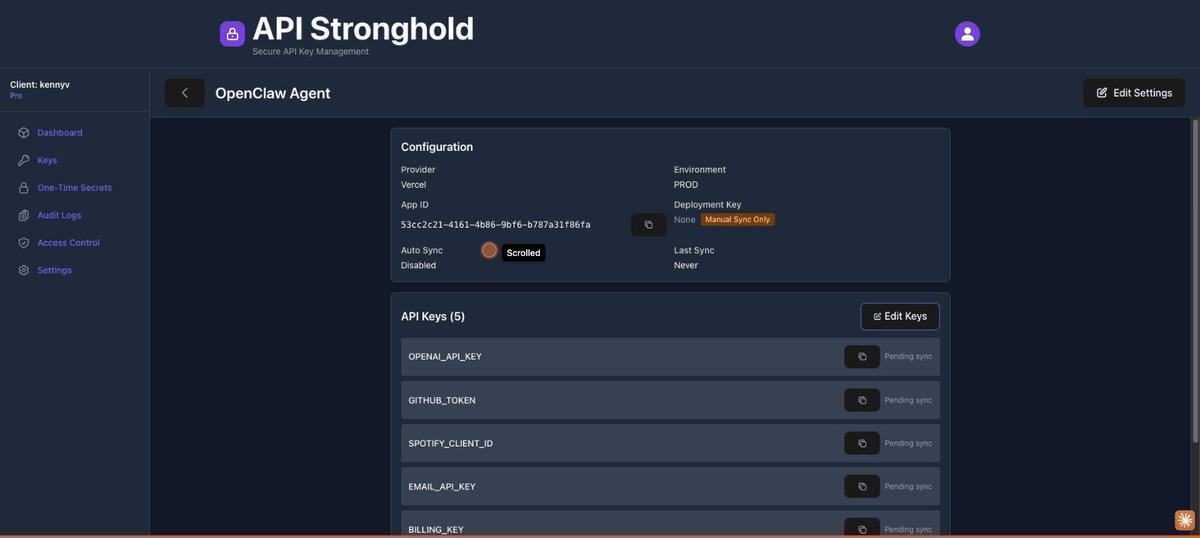
2. Create a Deployment Profile
Navigate to the Deployments page and click Create Deployment. Name it something descriptive like “OpenClaw Agent”. For the provider, you can choose from Vercel, GitHub Actions, or Cloudflare, but for this use case where we’re injecting keys via the CLI, the provider selection doesn’t matter. What matters are the key mappings.
Once the deployment is created, click into it and start adding key mappings. Each mapping ties one of your stored keys to the environment variable name your application expects:
| API Key | Environment Variable |
|---|---|
| OpenAI API Key | OPENAI_API_KEY |
| GitHub Token | GITHUB_TOKEN |
| Spotify Client ID | SPOTIFY_CLIENT_ID |
| Email API Key | EMAIL_API_KEY |
| Billing Key | BILLING_KEY |
Map all the keys, including the ones you’ll exclude. The exclusion happens at the group level, not the deployment level. This means the same deployment can serve different groups with different access scopes.
3. Create a User Group and Assign the Deployment
Go to the Users page and click Create Group. Name it “AI Agents”, this group will define the access boundary for any user account running inside an AI agent’s environment.
Once the group is created, assign the “OpenClaw Agent” deployment to it. This links the deployment profile to the group so members can pull keys from it.
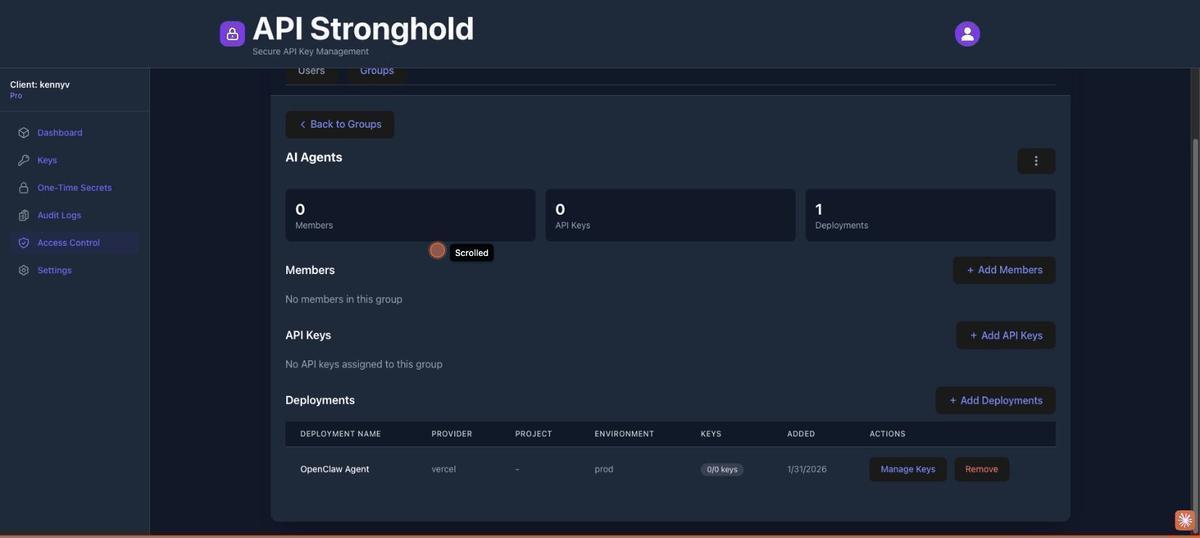
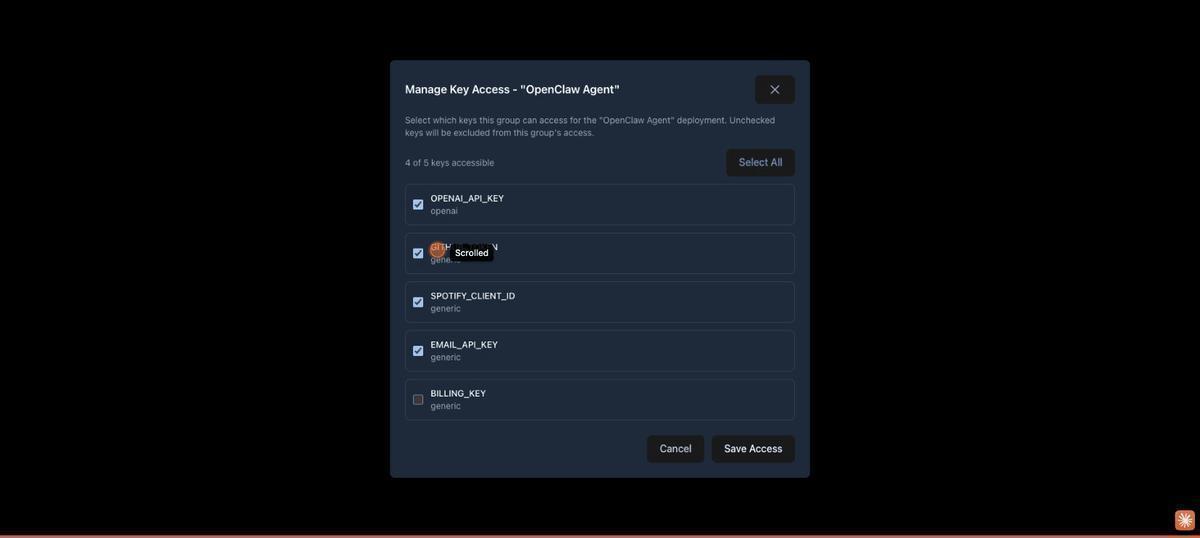
4. Configure Key Exclusions
This is where the scoping happens. On the group’s deployment row, click Manage Key Access. You’ll see every key mapped to the deployment with a toggle or checkbox. Turn off access for the keys the agent should not have:
- ✗
EMAIL_API_KEY, unchecked (excluded) - ✗
BILLING_KEY, unchecked (excluded) - ✓
OPENAI_API_KEY, checked (accessible) - ✓
GITHUB_TOKEN, checked (accessible) - ✓
SPOTIFY_CLIENT_ID, checked (accessible)
Save. The badge on the deployment row now shows “3/5 keys”, confirming only three keys are accessible to this group. The excluded keys are filtered server-side before the CLI ever sees them.
5. Create an Agent Identity
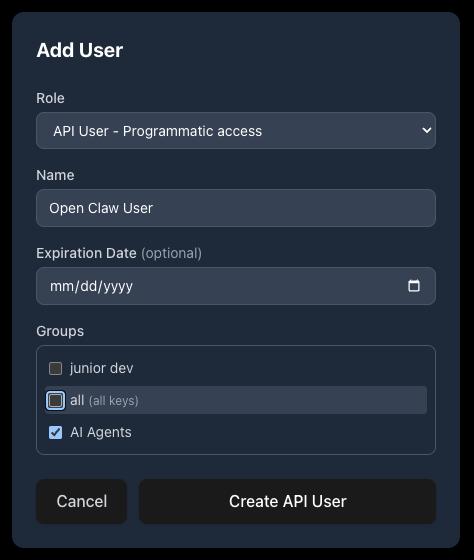
Still on the Users page, click Add User. You have two options for the agent’s identity:
Option A: API User (Recommended for Agents)
Select API User - Programmatic access from the Role dropdown. Give it a descriptive name like “Open Claw User”, optionally set an expiration date, and assign it to the “AI Agents” group. Click Create API User.
API Stronghold shows a one-time token, copy it immediately, as it won’t be displayed again. This token is used to authenticate the CLI non-interactively via api-stronghold-cli auth api-user --token <TOKEN>. API users are lightweight identities designed for programmatic access: they inherit the group’s key exclusion rules and don’t require an email address or password.
Every organization gets 1 free API user. Additional API users consume a paid seat on your plan.
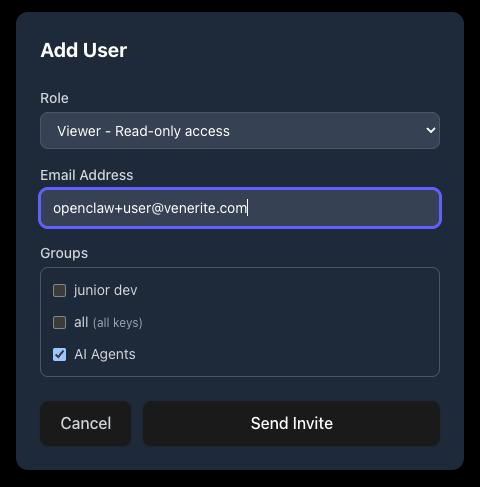
Option B: Human User
Alternatively, select a human role (User, Viewer, or Admin) and enter an email address. The invited user receives a one-time secret link containing their encrypted copy of the organization’s master key. They accept the invite, set their password, and authenticate via the CLI with api-stronghold-cli login.
Crucially, this user must not be an admin, admin accounts bypass all key exclusion rules. Add the user to the “AI Agents” group.
6. Set Up the VM or Container
Inside your VM or container, install the API Stronghold CLI and authenticate. The method depends on whether you created an API user or a human user in step 5.
macOS / Linux:
curl -fsSL https://www.apistronghold.com/cli/install.sh | shWindows (Command Prompt):
curl -fsSL https://www.apistronghold.com/cli/install.cmd -o install.cmd && install.cmd && del install.cmdThe Windows installer downloads the CLI to %USERPROFILE%\.api-stronghold\bin\ and adds it to your PATH automatically. See the CLI installation guide for more details.
If using an API User (Option A, recommended)
Authenticate with the token from step 5. No browser or password required:
# Authenticate with the API user token - fully non-interactive
api-stronghold-cli auth api-user --token <TOKEN>
The CLI validates the token against the server, fetches the API user’s identity and encrypted master key copy, and stores everything in ~/.api-stronghold/config.yaml:
# ~/.api-stronghold/config.yaml (generated automatically)
api-user-token: <your-api-user-token>
api-user-id: 7f3a2b1c-...
api-user-name: Open Claw User
client-id: 8c581370-...
api-url: https://server.apistronghold.com
API user tokens don’t expire on their own (unless an admin sets an expiration date), so the CLI stays authenticated indefinitely. The encrypted master key copy is fetched on demand when decrypting keys, it’s encrypted with the token itself via PBKDF2 + AES-GCM, so the server never has access to the plaintext master key.
If using a Human User (Option B)
Log in via the browser-based OAuth flow:
# Log in - this is a one-time interactive step
api-stronghold-cli login
The login command opens a browser-based OAuth flow. Once authenticated, it stores encrypted credentials in ~/.api-stronghold/config.yaml:
# ~/.api-stronghold/config.yaml (generated automatically)
access-token: eyJhbGciOiJIUzI1Ni...
refresh-token: abc123...
expires-at: 1757348334
api-url: https://server.apistronghold.com
auto-refresh-tokens: true
persist-password: true
encrypted-password: <PBKDF2 + AES-GCM encrypted master password>
The master password is encrypted locally using PBKDF2 with 310,000 iterations before being stored. Auto-refreshing tokens and persist-password: true mean the CLI runs fully non-interactively after this initial setup, no re-prompting for passwords.
persist-password is required for containers (human users only)
Make sure persist-password: true is set in the config before copying credentials into a container. Without it, the CLI will prompt for the master password interactively, which fails in non-interactive environments with inappropriate ioctl for device. You can set it during login or add it to the config file manually. This doesn’t apply to API users, they authenticate with their token and don’t use a master password.
7. Map Your Local Environment (Optional)
If you want a convenient shorthand for which deployment to use, the CLI supports local environment mapping. Instead of referencing a deployment by its UUID every time, you create a named alias that resolves to the deployment ID automatically.
First, find your deployment ID:
# List all deployments and their IDs
api-stronghold-cli deployment list
Then create a .api-stronghold-deployment file in your project directory with the mapping. The name is completely arbitrary, call it whatever makes sense for your workflow:
{
  "environment_mappings": {
    "production": "482bd7d9-38e0-4568-99be-6ae3a44d48a2"
  }
}
You can also add multiple mappings for different environments:
{
  "environment_mappings": {
    "production": "482bd7d9-38e0-4568-99be-6ae3a44d48a2",
    "staging": "a1b2c3d4-5678-90ab-cdef-1234567890ab"
  }
}
Alternatively, the CLI creates this file for you automatically. Run api-stronghold-cli deployment env-file <name> .env and the CLI will prompt you to select a deployment from your available list on the first run, saving the mapping for future calls.
Once the mapping exists, you can use the name anywhere you’d use a deployment ID:
# Sync secrets using the mapped name
api-stronghold-cli deployment sync production

# Run a command with secrets injected using the mapped name
api-stronghold-cli run production -- openclaw start
This step is optional, you can always reference deployments by UUID directly.
8. Wire Up OpenClaw’s Startup
In your OpenClaw startup script or container entrypoint, use the run command to launch the agent with scoped secrets:
#!/bin/bash
set -e

# Start OpenClaw with scoped secrets injected into the process
api-stronghold-cli run production -- openclaw start
The run command fetches and decrypts only the allowed keys, then injects them as environment variables into the child process. No file is written to disk, and nothing persists in the parent shell.
Docker sandbox note
If you’re running OpenClaw in Docker with agent sandboxing enabled, the sandbox container runs commands via a login shell (sh -lc) that may reset PATH. Ensure api-stronghold-cli is installed to a standard location like /usr/local/bin/, or add a script to /etc/profile.d/ in your custom sandbox image to persist the path.
When the container starts: the CLI authenticates with its stored tokens → the server checks the user’s group membership and filters out excluded keys → the CLI decrypts only the allowed keys client-side → injects them as environment variables into the child process → OpenClaw launches with exactly the keys it should have.
9. Verify the Scoping
Confirm the excluded keys aren’t present in the agent’s environment:
api-stronghold-cli run production -- env | grep -E 'OPENAI|GITHUB|SPOTIFY|EMAIL|BILLING'

# These should appear:
# OPENAI_API_KEY=sk-...
# GITHUB_TOKEN=ghp_...
# SPOTIFY_CLIENT_ID=abc123

# These should NOT appear - the server never sent them:
# EMAIL_API_KEY
# BILLING_KEY
You can also verify from the CLI directly:
# List all keys accessible to the current user
api-stronghold-cli key list

# Only the 3 allowed keys should appear - EMAIL_API_KEY and
# BILLING_KEY won't be in the list at all
Why This Approach Works
The eval pattern loads secrets into the shell’s memory, so keys never touch disk in the VM. No .env file to accidentally commit, no config file for the agent to read, no credentials baked into the container image.
Exclusions happen on the server, not the client. The non-admin user’s API request returns only what their group is authorized to access. Even a modified CLI binary can’t retrieve excluded keys because the server filters them before sending anything.
Zero-knowledge encryption means a server breach exposes nothing usable. API Stronghold encrypts keys client-side with your master password before storing them. The server holds encrypted blobs it can’t decrypt.
Key rotation is seamless. When you rotate a key in API Stronghold, the next eval call picks up the new value automatically. No SSH, no container redeploys, no CI pipeline updates.
Every key access is logged. You know exactly when the agent’s account fetched credentials and which deployment profile was used.
A Note on Container Lifecycle
For short-lived containers running one task at a time, the run command is all you need. Fetch keys at startup, do the work, container exits, keys disappear.
For long-running VMs where OpenClaw runs continuously, you’ll want to periodically restart the process to pick up rotated keys:
# In a cron job or periodic script - restart the agent with fresh keys
api-stronghold-cli run production -- openclaw start
The CLI’s auto-refresh token handling ensures authentication stays valid across these calls without re-prompting.
Advanced: Giving the Agent Direct CLI Access
The run command approach is the safest option for most setups. The agent never knows the CLI exists, so a prompt injection can’t trick it into fetching keys it shouldn’t have. The downside: secrets are static for the lifetime of the process. If a key rotates mid-session, the agent has a stale value until the next restart.
For long-running agents that need on-demand credential refresh, you can expose the CLI as a read-only tool inside OpenClaw. The trick is locking it down to a single command so the agent can only refresh secrets, not enumerate keys, create new ones, or target different deployments.
First, create a wrapper script that restricts the CLI to exactly one operation:
#!/bin/bash
# /usr/local/bin/refresh-secrets
# Thin wrapper - only allows refreshing the scoped production secrets
set -euo pipefail
exec api-stronghold-cli deployment env-file prod --stdout
Make it executable and remove the raw CLI from the agent’s PATH so the agent can only use the wrapper:
chmod +x /usr/local/bin/refresh-secretsNext, register it as an OpenClaw skill. Create a SKILL.md file in your workspace’s skills directory (<workspace>/skills/refresh-secrets/SKILL.md):
---
name: refresh-secrets
description: Refresh scoped API credentials from API Stronghold. Call this when an API key appears to be expired or invalid. Outputs export statements - eval the output to update the current environment.
metadata: {"openclaw": {"requires": {"bins": ["refresh-secrets"]}}}
---

Run `/usr/local/bin/refresh-secrets` and eval the output to reload
scoped secrets into the environment. This only returns credentials
the agent is authorized to access - no other CLI operations are
available.
OpenClaw discovers skills from three locations (highest precedence first): <workspace>/skills/, ~/.openclaw/skills/, and bundled skills. Placing it in the workspace directory keeps it scoped to the agent instance that needs it.
Once registered, the agent can invoke refresh-secrets as a skill when it detects a stale or rejected API key, but it has no access to key list, key create, login, or any other CLI subcommand.
Security tradeoff
Even with a locked-down wrapper, the agent now knows a secrets-fetching tool exists. A sophisticated prompt injection could try to get the agent to call it and exfiltrate the output. The eval-at-startup approach avoids this entirely because the agent has no tool to target. Use direct CLI access only when mid-session key rotation is a hard requirement.
Full CLI Access for Power Users
If you want the agent to manage secrets directly, listing keys, pulling from multiple deployments, or switching environments on the fly, you can expose the full api-stronghold-cli as an OpenClaw skill. More flexibility, but it needs careful guardrails.
Install the CLI in the container and register it as a skill (<workspace>/skills/api-stronghold/SKILL.md):
---
name: api-stronghold
description: >
  Manage API keys and secrets via the API Stronghold CLI. Available
  subcommands: `key list`, `key get <name>`,
  `run <environment> -- <command>`. Use this tool to list
  available credentials, retrieve individual key values, or run a
  command with scoped secrets injected as environment variables.
metadata: {"openclaw": {"requires": {"bins": ["api-stronghold-cli"]}}}
---

Run `api-stronghold-cli` with the appropriate subcommand.

Examples:
- List available keys: `api-stronghold-cli key list`
- Get a single key: `api-stronghold-cli key get OPENAI_API_KEY`
- Load all scoped secrets: `api-stronghold-cli run production -- <command>`
The agent is still constrained by API Stronghold’s server-side access controls. The non-admin user account and group-level key exclusions from steps 3–5 still apply, so the agent can run key list all day and only ever see what its group is authorized to access. Excluded keys are never returned by the API.
That said, full CLI access widens the attack surface:
- The agent can attempt
key create,login, or other write operations. If the user account has write permissions, those calls will succeed. - Prompt injection has more tools to work with. An attacker could instruct the agent to exfiltrate individual key values via
key get. - If the agent retrieves key values inline, they end up in its conversation history.
To reduce those risks:
- Use a read-only user account. If API Stronghold supports role-based permissions, restrict the agent’s account to read-only access on keys and deployments.
- Run in a sandboxed container. OpenClaw’s agent sandboxing (
agents.defaults.sandbox) isolates tool execution. Use a restricted Docker network that only allows traffic toserver.apistronghold.com, the CLI needs outbound access to fetch keys, but the sandbox shouldn’t be able to reach arbitrary endpoints. - Review the agent’s conversation logs. If a key value appears in the chat history, treat it as potentially exposed and rotate it.
Recommendation
For most setups, the eval-at-startup approach or the locked-down wrapper script are the better choices. Full CLI access is appropriate when you’re running OpenClaw as a DevOps assistant that genuinely needs to manage secrets across multiple environments, and the agent’s user account, network isolation, and key exclusion rules are all properly configured.
Setting Up the OpenClaw Gateway
Before configuring the sandbox and secrets, you need the OpenClaw gateway running. The gateway is the core process that manages AI sessions, communicates with model providers (Anthropic, OpenAI, etc.), and spawns sandbox containers for tool execution.
Prerequisites
- Docker Desktop (macOS/Windows) or Docker Engine (Linux)
- Docker Compose (included with Docker Desktop)
- An Anthropic API key or Claude setup-token for the AI model
Build and Run
Clone the OpenClaw repo and build the gateway image:
git clone https://github.com/openclaw/openclaw.git
cd openclaw
docker build -t openclaw:local .
Then run the interactive setup script:
./docker-setup.shmacOS bash version
The setup script uses bash 4+ features (declare -A). macOS ships with bash 3.2. If you see declare: -A: invalid option, install a newer bash via Homebrew (brew install bash) and run the script with /opt/homebrew/bin/bash ./docker-setup.sh.
The script builds the image, generates a gateway auth token, and launches an interactive onboarding wizard. When prompted, choose these options:
| Prompt | Recommended Choice |
|---|---|
| Risk acknowledgement | Yes |
| Onboarding mode | QuickStart |
| Auth provider | Anthropic setup-token (run claude setup-token in another terminal to generate one) |
| Token name | Leave blank (default) |
| Channels | Skip or configure as needed |
| Install shell completion | Optional |
| Install gateway daemon | No (Docker manages the process) |
After onboarding completes, the gateway starts automatically. The script outputs the gateway token and connection details:
Gateway running with host port mapping.
Config: ~/.openclaw
Token: <your-gateway-token>
Verify the Gateway
Confirm the gateway is running:
docker ps | grep openclaw-gatewayAccess the Control UI at http://127.0.0.1:18789/?token=YOUR_GATEWAY_TOKEN.
At this point you have a working gateway, but it’s running tools directly inside the gateway container: no sandbox isolation. The next sections cover building a custom sandbox image with the API Stronghold CLI, and configuring the gateway to use it.
Docker Setup: Baking the CLI into the Sandbox
OpenClaw uses a dual-container architecture: the gateway runs the AI agent and manages sessions (either on the host or in its own container), and the sandbox is a separate isolated container where the agent executes tools like shell commands and browser actions. The gateway spawns sandbox containers as siblings via the Docker socket, it doesn’t run inside the sandbox. OpenClaw itself isn’t installed in the sandbox: the sandbox is just the execution environment the gateway controls.
This means the secrets need to be available inside the sandbox, since that’s where tool commands run and where environment variables are read. The CLI and credentials get baked into the sandbox image. The gateway manages the sandbox lifecycle, creating it with docker create, starting it with docker start, and running commands inside it with docker exec.
Sandbox working directory
OpenClaw sets the sandbox working directory to /workspace and mounts a host directory there. The sandbox image’s default HOME (e.g., /var/lib/nova) is not the same as the working directory. If you bake credentials into the image at $HOME/.api-stronghold/, you’ll need to copy them into /workspace/.api-stronghold/ at container creation time, either via a custom entrypoint or OpenClaw’s setupCommand configuration. See Option C for the full setup.
Choosing a Base Image
OpenClaw’s sandbox images are local-build-only, there’s no pre-built registry image. You build them from the OpenClaw repo:
git clone https://github.com/openclaw/openclaw.git
cd openclaw
scripts/sandbox-setup.sh
This creates the local openclaw-sandbox:bookworm-slim image. There are three variants you can build:
| Image | Build Script | Use Case |
|---|---|---|
openclaw-sandbox:bookworm-slim | scripts/sandbox-setup.sh | Default, minimal, git, curl, jq |
openclaw-sandbox-common:bookworm-slim | scripts/sandbox-common-setup.sh | Includes common developer tooling |
openclaw-sandbox-browser:bookworm-slim | scripts/sandbox-browser-setup.sh | Includes browser automation |
Alternatively, there are community-maintained pre-built images you can use as a base instead:
| Image | Notes |
|---|---|
ghcr.io/phioranex/openclaw-docker:latest | Community-maintained, pre-built on GHCR |
1panel/openclaw | Requires Docker Desktop 4.37.1+ |
These are full OpenClaw images (gateway + runtime) rather than sandbox-only images, so the Dockerfile and architecture would differ. For the scoped secrets setup described here, you want the sandbox images, they’re the execution environment where your secrets need to be available.
Base: CLI + Credentials
All three approaches need the CLI installed and authenticated inside the sandbox. Start with a Dockerfile that extends your chosen sandbox image:
FROM openclaw-sandbox:bookworm-slim

# Install the API Stronghold CLI
RUN curl -fsSL https://www.apistronghold.com/cli/install.sh | sh

# Copy pre-authenticated credentials
COPY .api-stronghold/ /var/lib/nova/.api-stronghold/
RUN chown -R nova:nova /var/lib/nova/.api-stronghold
Authenticate on your host machine first, then copy the ~/.api-stronghold/ directory into the build context:
- API user (recommended): Run
api-stronghold-cli auth api-user --token <TOKEN>, no browser needed, works in headless CI/CD environments - Human user: Run
api-stronghold-cli login, requires a browser for the OAuth flow
The stored credentials work non-interactively from that point forward. API user tokens don’t expire by default; human user tokens auto-refresh via the stored refresh token.
Don't commit credentials
Add .api-stronghold/ to your .dockerignore exceptions carefully and never commit the directory to version control. For CI/CD builds, inject the credentials as a Docker build secret instead:
docker build --secret id=api-stronghold,src=$HOME/.api-stronghold/config.yaml -t openclaw-agent .Then in the Dockerfile, mount the secret during the build step that needs it:
RUN --mount=type=secret,id=api-stronghold,target=/var/lib/nova/.api-stronghold/config.yaml \
    api-stronghold-cli key list > /dev/null  # verify auth works
Option A: Eval at Startup (Recommended)
The simplest approach, load secrets in the entrypoint so they’re available as environment variables when the gateway executes tools in the sandbox. No skills needed.
FROM openclaw-agent-base AS runtime

# Copy the entrypoint script
COPY entrypoint.sh /usr/local/bin/entrypoint.sh
RUN chmod +x /usr/local/bin/entrypoint.sh

USER nova
ENTRYPOINT ["/usr/local/bin/entrypoint.sh"]
Where entrypoint.sh is:
#!/bin/bash
set -e

# Execute whatever command the gateway sends, with scoped secrets injected
exec api-stronghold-cli run production -- "$@"
The CLI doesn’t need to be on the agent’s PATH since the agent (running on the gateway) never calls it directly; only the sandbox entrypoint does.
Network access required at startup
The OpenClaw sandbox defaults to network: "none", which blocks all outbound traffic. The CLI needs to reach server.apistronghold.com during the entrypoint to fetch secrets, so you must set network: "bridge" in your sandbox config (agents.defaults.sandbox.docker.network in openclaw.json). Adding extra_hosts alone is not enough, it only provides a DNS mapping and does not override network isolation.
Sandbox lifecycle and entrypoints
OpenClaw creates sandbox containers with docker create ... sleep infinity, then starts them and runs commands via docker exec. A custom ENTRYPOINT in your Dockerfile will replace the sleep infinity command, which can cause the container to exit immediately after the entrypoint script finishes. If you use a custom entrypoint, make sure it falls through to exec "$@" so the sleep infinity command keeps the container alive. Alternatively, skip the custom entrypoint and use OpenClaw’s setupCommand config to run initialization at container creation time, this is the approach used in Option C.
Option B: Locked-Down Wrapper Skill
Install the wrapper script and skill file, then remove the raw CLI from the agent’s PATH:
FROM openclaw-agent-base AS runtime

# Install the wrapper script
COPY refresh-secrets.sh /usr/local/bin/refresh-secrets
RUN chmod +x /usr/local/bin/refresh-secrets

# Move the CLI out of the default PATH so the agent can't call it directly
RUN mv /usr/local/bin/api-stronghold-cli /opt/api-stronghold/bin/api-stronghold-cli
ENV API_STRONGHOLD_CLI=/opt/api-stronghold/bin/api-stronghold-cli

# Register the OpenClaw skill
COPY skills/refresh-secrets/ /var/lib/nova/workspace/skills/refresh-secrets/
RUN chown -R nova:nova /var/lib/nova/workspace/skills/

# Still load secrets at boot for the initial environment
COPY entrypoint.sh /usr/local/bin/entrypoint.sh
RUN chmod +x /usr/local/bin/entrypoint.sh

USER nova
ENTRYPOINT ["/usr/local/bin/entrypoint.sh"]
Update the wrapper script to use the relocated binary:
#!/bin/bash
# /usr/local/bin/refresh-secrets
set -euo pipefail
exec /opt/api-stronghold/bin/api-stronghold-cli deployment env-file prod --stdout
This gives the agent the refresh-secrets skill for mid-session refreshes while keeping the full CLI out of reach.
Option C: Full CLI Access
Install the CLI on the agent’s PATH and register the skill. This example uses the browser sandbox variant as a base image, which you need to build locally from the OpenClaw repo first:
git clone https://github.com/openclaw/openclaw.git
cd openclaw
scripts/sandbox-browser-setup.sh
This creates the openclaw-sandbox-browser:bookworm-slim image locally. Then build your custom sandbox on top of it:
FROM openclaw-sandbox-browser:bookworm-slim

# Install the API Stronghold CLI
COPY api-stronghold-cli-linux /usr/local/bin/api-stronghold-cli
RUN chmod +x /usr/local/bin/api-stronghold-cli

# Copy pre-authenticated credentials
COPY .api-stronghold/ /var/lib/nova/.api-stronghold/
RUN chown -R nova:nova /var/lib/nova/.api-stronghold

# CLI stays on PATH - the agent can invoke it directly
# Register the OpenClaw skill
COPY skills/api-stronghold/ /var/lib/nova/workspace/skills/api-stronghold/
RUN chown -R nova:nova /var/lib/nova/workspace/skills/

USER nova
Note: unlike Options A and B, Option C does not use a custom entrypoint. The sandbox image’s default entrypoint (sleep infinity) is required, OpenClaw’s gateway creates the container with sleep infinity and then runs commands inside it via docker exec. A custom entrypoint that expects "$@" will conflict with this lifecycle. Instead, credentials are copied into the sandbox’s working directory at container creation time using OpenClaw’s setupCommand (see gateway configuration below).
Gateway Configuration for Sandbox Spawning
OpenClaw uses a dual-container architecture: the gateway container manages AI sessions and spawns sandbox containers as siblings via the host’s Docker socket. The gateway doesn’t run inside the sandbox, it creates and controls sandbox containers from the outside using docker create, docker start, and docker exec.
This means the gateway container needs:
- The Docker CLI, the gateway shells out to the
dockerbinary to manage sandbox containers - The Docker socket, mounted from the host so the gateway can talk to the Docker daemon
- Root permissions (or docker group membership), to access the socket
- Host-matching paths, sandbox volume mounts are resolved by the host’s Docker daemon, not inside the gateway container
Rebuilding the Gateway Image with Docker CLI
The default OpenClaw gateway image doesn’t include the Docker CLI. Rebuild it with the docker.io package:
cd ~/git/openclaw
OPENCLAW_DOCKER_APT_PACKAGES="docker.io" docker build \
  --build-arg "OPENCLAW_DOCKER_APT_PACKAGES=docker.io" \
  -t openclaw:local .
Docker Compose Configuration
The OpenClaw repo ships a docker-compose.yml that’s tracked in version control. Rather than editing it directly (which creates merge conflicts on every git pull), use a docker-compose.override.yml file. Docker Compose automatically merges overrides on top of the base file when you run docker compose up, no extra flags needed.
The base docker-compose.yml already defines the services, ports, environment variables, and default volumes. Your override only needs to add the sandbox-specific changes:
# docker-compose.override.yml (not tracked in git)
services:
  openclaw-gateway:
    user: root  # Required for Docker socket access
    environment:
      # HOME must match the host path so sandbox mounts resolve correctly
      # on Docker Desktop. The gateway resolves ~/.openclaw/sandboxes/...
      # and passes that path to `docker create -v`. Docker Desktop resolves
      # the path on the host, not inside the gateway container.
      HOME: /Users/youruser
    volumes:
      - ${OPENCLAW_CONFIG_DIR}:/Users/youruser/.openclaw
      - ${OPENCLAW_WORKSPACE_DIR}:/Users/youruser/.openclaw/workspace
      # Sandboxes dir must be explicitly mounted so Docker Desktop
      # can share it with sibling sandbox containers
      - ${OPENCLAW_CONFIG_DIR}/sandboxes:/Users/youruser/.openclaw/sandboxes
      # Docker socket for spawning sandbox containers
      - /var/run/docker.sock:/var/run/docker.sock
Add docker-compose.override.yml to your .gitignore so it stays local to your machine.
Why HOME must match the host path
This is the trickiest part of the setup. When the gateway runs docker create -v /Users/youruser/.openclaw/sandboxes/agent-main-abc123:/workspace, that path is resolved by the host’s Docker daemon, not inside the gateway container. If the gateway’s HOME is /root (the default when running as root), it produces mount paths like /root/.openclaw/sandboxes/... which don’t exist on the host, and Docker Desktop rejects the mount with “path is not shared from the host.” Setting HOME to your actual macOS home directory makes the paths match.
OpenClaw Configuration (~/.openclaw/openclaw.json)
Configure the sandbox to use your custom image with the CLI baked in:
{
  "agents": {
    "defaults": {
      "sandbox": {
        "mode": "all",
        "docker": {
          "image": "test-sandbox",
          "network": "bridge",
          "setupCommand": "mkdir -p /workspace/.api-stronghold && cp /var/lib/nova/.api-stronghold/config.yaml /workspace/.api-stronghold/config.yaml"
        }
      }
    }
  }
}
Three settings matter here:
mode: "all", sandboxes every session, including the main agent. The alternative"non-main"only sandboxes secondary agents, which means the main agent runs directly in the gateway container where the CLI isn’t installed.network: "bridge": the CLI needs outbound HTTPS access toserver.apistronghold.comto authenticate and fetch keys. The default"none"blocks all network traffic.setupCommand, runs once when the sandbox container is created. This copies the baked-in credentials from the image’s home directory (/var/lib/nova/.api-stronghold/) into the sandbox working directory (/workspace/.api-stronghold/). This is necessary because OpenClaw sets the sandbox working directory to/workspaceand the CLI resolves its config relative to$HOME, which inside the sandbox maps to/workspace, not/var/lib/nova.
After updating the config, remove any existing sandbox containers and restart the gateway:
# Remove stale sandbox containers (they cache the old config)
docker ps -a --format '{{.Names}}' | grep openclaw-sbx | xargs -r docker rm -f

# Restart the gateway
docker compose restart openclaw-gateway
Accessing the Control UI
If connecting to the Control UI over HTTP (not HTTPS), you may see a “pairing required” error. The Control UI uses WebCrypto for device authentication, which requires a secure context. When running in Docker, the browser connects through Docker’s bridge network, which the gateway doesn’t recognize as a local connection.
Add controlUi.allowInsecureAuth to your gateway config to bypass device pairing over HTTP:
{
  "gateway": {
    "controlUi": {
      "allowInsecureAuth": true
    }
  }
}
Then access the UI with the token in the URL:
http://127.0.0.1:18789/?token=YOUR_GATEWAY_TOKENSecurity note
allowInsecureAuth should only be used for local development and testing. For production or network-exposed gateways, use HTTPS or Tailscale so the Control UI has a proper secure context for device pairing.
Network Lockdown
If you’re using this option, lock down the container’s network to prevent secret exfiltration. The most effective approach is a custom Docker network that only allows traffic to API Stronghold’s API server:
# Create a restricted network
docker network create --driver bridge openclaw-restrictedservices:
openclaw-agent:
build: .
networks:
- openclaw-restrictedThe container needs outbound access to server.apistronghold.com for the CLI to fetch and refresh secrets. Avoid using network_mode: "none" with extra_hosts, extra_hosts only adds a DNS mapping and does not punch through network isolation. With network_mode: "none", the CLI can’t reach the API at all. Use a restricted bridge network instead, and apply firewall rules or a proxy to limit outbound traffic to API Stronghold’s endpoints only.
The Dual-Container Security Model
The separation between gateway and sandbox is a security feature, not just an implementation detail:
- The gateway holds the AI model credentials (Anthropic API key) and manages sessions, but has no access to your application secrets (API keys in API Stronghold). Even if the gateway container is compromised, the attacker gets AI provider tokens, not your Stripe, GitHub, or OpenAI keys.
- The sandbox holds the scoped application secrets (via the CLI) but has no access to the AI model credentials. A compromised sandbox has access only to the keys its API Stronghold user group allows, and with
network: "bridge"restricted to API Stronghold’s endpoints, exfiltration is limited. - The Docker socket is mounted only in the gateway, not the sandbox. The agent running inside the sandbox cannot spawn new containers, modify its own network settings, or escape its isolation.
This defense-in-depth means no single container holds both the AI provider credentials and your application secrets.
Using OPENCLAW_EXTRA_MOUNTS Instead of a Custom Image
If you’d rather not build a custom sandbox image, you can mount the CLI and skill files from the host into the sandbox using OpenClaw’s Docker setup:
export OPENCLAW_EXTRA_MOUNTS="/usr/local/bin/api-stronghold-cli:/usr/local/bin/api-stronghold-cli:ro,$HOME/.api-stronghold:/var/lib/nova/.api-stronghold:ro,$HOME/openclaw-skills:/var/lib/nova/workspace/skills:ro"
./docker-setup.sh
This is faster for development but less portable than a baked image for production deployments.
Verifying the End-to-End Setup
Once the gateway is running and the sandbox is configured, verify everything works by opening the Control UI and asking the agent to use the CLI directly.
1. Confirm Both Containers Are Running
# The gateway should be running
docker ps | grep openclaw-gateway

# After starting a session, the sandbox should appear
docker ps | grep openclaw-sbx
You should see two containers: the gateway (openclaw:local) and the sandbox (test-sandbox or your custom image name).
2. Test from the Control UI
Open the Control UI at http://127.0.0.1:18789/?token=YOUR_GATEWAY_TOKEN and start a new session. Ask the agent:
Can you run
api-stronghold-cli key listto get a list of API keys?
The agent should execute the command inside the sandbox and return results showing only the keys your user group is authorized to access:
Found 3 keys for client 8c581370-...
ID                                    Name              Provider    Group
80bc7cf4-69b0-4135-b7c0-1185b23c844d  My_Stripe_Key     generic
a1b2c3d4-5678-90ab-cdef-123456789abc  OpenAI_Key        openai
d4e5f6a7-8901-bcde-f234-567890abcdef  GitHub_Token      github
Excluded keys (email, billing, etc.) should not appear in the list at all, they’re filtered server-side before the CLI ever sees them.
3. Verify Key Exclusions
Ask the agent to check for a key you know is excluded:
Can you run
api-stronghold-cli key listand tell me if you see an EMAIL_API_KEY?
The agent should confirm it’s not in the list. If excluded keys appear, check your user group configuration in API Stronghold, the agent’s user account may have admin privileges or the key exclusion rules may not be saved.
Troubleshooting
If the agent reports the CLI isn’t found or isn’t authenticated:
| Symptom | Cause | Fix |
|---|---|---|
api-stronghold-cli: command not found | CLI not installed in sandbox image | Rebuild the sandbox image with the CLI at /usr/local/bin/ |
Not logged in. Run 'api-stronghold-cli login' | Credentials not copied to /workspace/ | Check the setupCommand in openclaw.json, it should copy config from /var/lib/nova/.api-stronghold/ to /workspace/.api-stronghold/ |
spawn docker EACCES | Gateway can’t access Docker socket | Ensure user: root and /var/run/docker.sock volume mount in docker-compose.yml |
Mounts denied: path is not shared | Host path mismatch on Docker Desktop | Set HOME in the gateway container to match your macOS home directory (e.g., /Users/youruser) |
pairing required | Control UI device auth over HTTP | Add controlUi.allowInsecureAuth: true to gateway config |
| No sandbox container spawned | Sandbox mode is "non-main" | Change to "all" in agents.defaults.sandbox.mode |
Getting Started
API Stronghold offers deployment profiles and key exclusion management on all plans. To set this up:
- Sign up or log in
- Add your API keys on the Keys page
- Create a deployment profile and map keys to environment variable names
- Create a user group, assign the deployment, and configure key exclusions
- Create an API user (1 free per org) or invite a non-admin human user, and add it to the group
- Install the CLI in your VM or container and authenticate (
api-stronghold-cli auth api-user --token <TOKEN>for API users, orapi-stronghold-cli loginfor human users) - Use
api-stronghold-cli run production -- openclaw startin your startup script
Ready to lock down your agent's credentials?
Takes about 10 minutes to set up. Your agent gets only what it needs. Nothing more reaches the context.
No credit card required
📚 Related Reading
- Stop Giving AI Agents Your API Keys, The core pattern this guide builds on, with a full walkthrough of the proxy approach
- The Phantom Token Pattern for Production AI Agents, How phantom tokens eliminate credential exposure in production deployments
- Cursor and Claude Code Are Reading Your .env File, Why .gitignore is not enough and what to do instead
- Multi-Agent Pipelines Need Credential Isolation, Per-agent session scoping for complex pipelines
- OpenClaw Docker Quickstart, Get running in 10 minutes with the companion tutorial