What You'll Build
By the end of this guide: OpenClaw running in Docker, your API keys injected at runtime via API Stronghold, and a sandbox container that only sees the keys it’s authorized to use. Setup takes about 10 minutes.
Right now, your OpenClaw agent probably has access to every API key in your .env file. That means a prompt injection, a hallucinated tool call, or a misconfigured session can reach your Stripe key, your GitHub token, your email API, everything. This tutorial fixes that.
You’ll containerize OpenClaw and wire it up to API Stronghold so each agent session gets only the keys it actually needs. Excluded keys never reach the sandbox. They’re filtered server-side before the CLI even runs.
This is the hands-on version of Securing OpenClaw with Scoped Secrets. That post covers the full architecture and advanced options. This one is step-by-step: clone, configure, run.
What Is Docker? (30-Second Primer)
If you’re new to Docker: it lets you run applications in containers, isolated environments that bundle everything an app needs. Think lightweight virtual machine.
For AI agents like OpenClaw, that isolation matters. The agent can’t reach your host system’s files or other credentials. The same container runs identically on any machine. And if something goes wrong, the damage stays inside the box.
Prerequisites
Before starting, you need:
- Docker Desktop installed (download here)
- An API Stronghold account (start your free trial)
- Your API keys already added to API Stronghold with a deployment profile and user group configured (see Steps 1-5 in the main guide)
- An Anthropic API key for OpenClaw’s AI model
Do NOT use your Claude Max subscription
Important: Do not use your Claude Pro or Max consumer subscription with OpenClaw or any automated AI agent. Anthropic’s terms of service prohibit using consumer subscriptions for automated or programmatic access, and users have reported account bans for doing so. You need a separate Anthropic API key from console.anthropic.com with pay-as-you-go billing. This is a different product from the claude.ai consumer subscription.
Already have API Stronghold set up?
If you’ve already added your keys, created a deployment profile, set up key exclusions, and have an API user token, skip ahead to Build the Gateway.
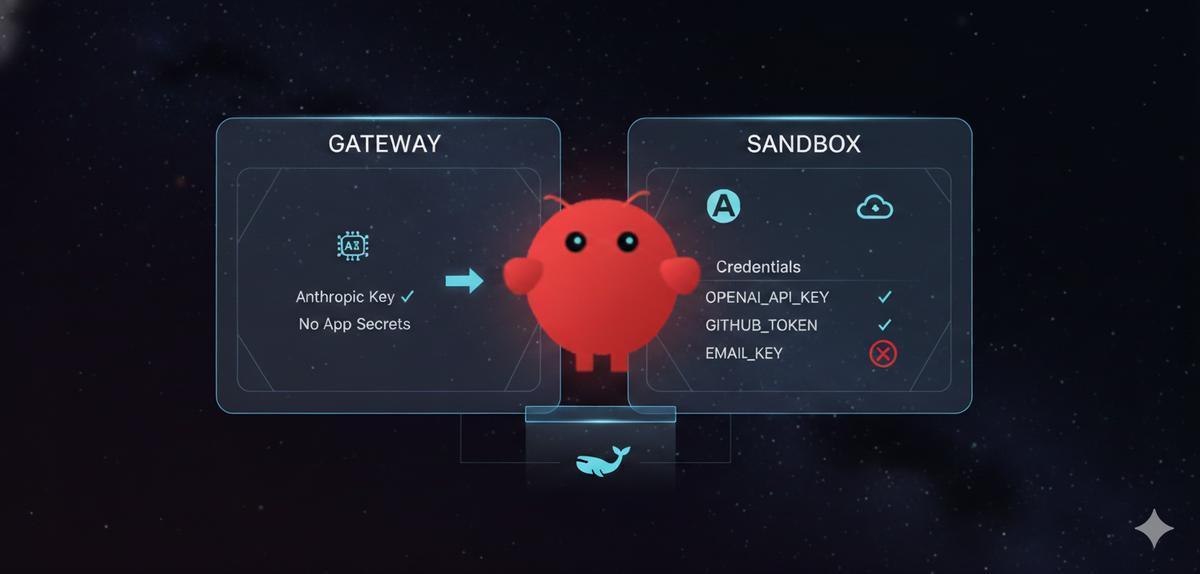
The Architecture (What We’re Building)
OpenClaw uses a dual-container model:
┌─────────────────────────────────────────────────────────┐
│  Your Machine                                           │
│                                                         │
│  ┌─────────────────────┐     ┌─────────────────────┐   │
│  │  Gateway Container  │────▶│  Sandbox Container  │   │
│  │  (AI model creds)   │     │  (your API keys)    │   │
│  │                     │     │                     │   │
│  │  Anthropic key only │     │  OPENAI_API_KEY ✓   │   │
│  │  No app secrets     │     │  GITHUB_TOKEN ✓     │   │
│  └─────────────────────┘     │  EMAIL_KEY ✗        │   │
│            │                 └─────────────────────┘   │
│            │ Docker socket                              │
│            ▼                                            │
│  ┌─────────────────────┐                               │
│  │   Docker Daemon     │                               │
│  └─────────────────────┘                               │
└─────────────────────────────────────────────────────────┘
The gateway talks to the AI model (Claude/GPT) and manages sessions. The sandbox runs the agent’s tools and has your application secrets. They’re separate containers, a compromise of one doesn’t expose both sets of credentials.
Step 1: Build the Gateway
Clone OpenClaw and build the gateway image with the Docker CLI included:
git clone https://github.com/openclaw/openclaw.git
cd openclaw

# Build gateway with Docker CLI (needed to spawn sandbox containers)
OPENCLAW_DOCKER_APT_PACKAGES="docker.io" docker build \
  --build-arg "OPENCLAW_DOCKER_APT_PACKAGES=docker.io" \
  -t openclaw:local .
What's happening here?
The --build-arg tells Docker to install the docker.io package inside the gateway image. The gateway needs the Docker CLI to create and manage sandbox containers.
Step 2: Build the Sandbox
Build the base sandbox image, then create a custom one with the API Stronghold CLI:
# Build the base sandbox image
scripts/sandbox-setup.sh
Now create a custom sandbox image. First, authenticate the CLI on your host machine:
macOS / Linux:
curl -fsSL https://www.apistronghold.com/cli/install.sh | shWindows (Command Prompt):
curl -fsSL https://www.apistronghold.com/cli/install.cmd -o install.cmd && install.cmd && del install.cmdThe Windows installer places the CLI in %USERPROFILE%\.api-stronghold\bin\ and adds it to your PATH automatically. Restart your terminal after installing. For more details, see the CLI installation guide.
Then authenticate with your API user token:
api-stronghold-cli auth api-user --token YOUR_API_USER_TOKENCreate a Dockerfile.sandbox in the openclaw directory:
FROM openclaw-sandbox:bookworm-slim

# Install the API Stronghold CLI
RUN curl -fsSL https://www.apistronghold.com/cli/install.sh | sh

# Copy your pre-authenticated credentials
COPY .api-stronghold/ /var/lib/nova/.api-stronghold/
RUN chown -R nova:nova /var/lib/nova/.api-stronghold

USER nova
Copy your credentials and build:
# Copy credentials into build context
cp -r ~/.api-stronghold .api-stronghold

# Build the custom sandbox
docker build -f Dockerfile.sandbox -t openclaw-sandbox-secure:latest .

# Clean up (don't commit credentials!)
rm -rf .api-stronghold
Step 3: Configure the Gateway
Create a docker-compose.override.yml file (this won’t conflict with OpenClaw’s tracked compose file):
# docker-compose.override.yml
services:
  openclaw-gateway:
    user: root
    environment:
      # Must match your actual home directory for volume mounts to work
      HOME: /Users/youruser  # Change this!
    volumes:
      - ${OPENCLAW_CONFIG_DIR}:/Users/youruser/.openclaw
      - ${OPENCLAW_WORKSPACE_DIR}:/Users/youruser/.openclaw/workspace
      - ${OPENCLAW_CONFIG_DIR}/sandboxes:/Users/youruser/.openclaw/sandboxes
      - /var/run/docker.sock:/var/run/docker.sock
Finding Your Home Directory
You must replace /Users/youruser with your actual home directory path. To find it:
# macOS / Linux
echo $HOME
# Example output: /Users/kenny or /home/kenny

# Windows (PowerShell)
echo $env:USERPROFILE
# Example output: C:\Users\kenny
Use this exact path in three places:
- The
HOMEenvironment variable - All three volume mount destinations (the part after the colon)
For example, if your home directory is /Users/kenny:
environment:
  HOME: /Users/kenny
volumes:
  - ${OPENCLAW_CONFIG_DIR}:/Users/kenny/.openclaw
  - ${OPENCLAW_WORKSPACE_DIR}:/Users/kenny/.openclaw/workspace
  - ${OPENCLAW_CONFIG_DIR}/sandboxes:/Users/kenny/.openclaw/sandboxes
  - /var/run/docker.sock:/var/run/docker.sock
Why does HOME matter? (This is the #1 setup gotcha)
This is the trickiest part of the Docker setup and catches most people. Here’s what happens:
- The gateway container runs as
root, so its defaultHOMEis/root - When the gateway spawns a sandbox, it tells Docker to mount
$HOME/.openclaw/sandboxes/... - Docker Desktop resolves that path on the host machine, not inside the container
- If
HOME=/rootinside the gateway, Docker looks for/root/.openclaw/sandboxes/on your Mac, which doesn’t exist - Docker fails with:
Mounts denied: path is not shared from the host
By setting HOME to your actual macOS/Linux home directory, the paths match and mounts work correctly.
Your OpenClaw agent shouldn't hold real API keys
API Stronghold scopes credentials to each container session. Keys that aren't needed never reach the sandbox.
No credit card required
Step 4: Configure the Sandbox
Edit ~/.openclaw/openclaw.json (create it if it doesn’t exist):
{
  "agents": {
    "defaults": {
      "sandbox": {
        "mode": "all",
        "docker": {
          "image": "openclaw-sandbox-secure:latest",
          "network": "bridge",
          "setupCommand": "mkdir -p /workspace/.api-stronghold && cp /var/lib/nova/.api-stronghold/config.yaml /workspace/.api-stronghold/config.yaml"
        }
      }
    }
  },
  "gateway": {
    "controlUi": {
      "allowInsecureAuth": true
    }
  }
}
What these settings do:
| Setting | Purpose |
|---|---|
mode: "all" | Sandbox every session, including the main agent |
network: "bridge" | Allow outbound network access (CLI needs to reach API Stronghold) |
setupCommand | Copy credentials to the sandbox’s working directory on startup |
allowInsecureAuth | Let you access the Control UI over HTTP (local dev only) |
Step 5: Start the Gateway
Run the interactive setup:
./docker-setup.shWhen prompted:
- Acknowledge the risk warning
- Choose QuickStart for onboarding mode
- Select Anthropic setup-token for auth (run
claude setup-tokenin another terminal) - Skip channels configuration
- Say No to installing the gateway daemon (Docker manages it)
After setup completes, note the gateway token displayed in the output.
Step 6: Verify It Works
Open the Control UI at http://127.0.0.1:18789/?token=YOUR_GATEWAY_TOKEN.
Start a new session and ask the agent:
Can you run
api-stronghold-cli key listto show what API keys are available?
You should see only the keys your API Stronghold user group is authorized to access. Excluded keys (email, billing, etc.) won’t appear.
Check both containers are running:
docker ps | grep openclawYou should see both the gateway and sandbox containers.
What You’ve Built
Your AI agent runs in an isolated Docker container with access to only the keys you’ve explicitly allowed. Keys excluded at the group level don’t exist as far as the agent is concerned. It gets fresh credentials each session, and nothing is stored on disk inside the container.
Next Steps
This quickstart covers the simplest path: loading secrets at container startup. If you need the agent to refresh credentials mid-session, want full CLI access for DevOps use cases, need to lock down the container’s network, or run into issues, the complete guide has all of that: Securing OpenClaw with Scoped Secrets.
Run OpenClaw with keys your agent can't exfiltrate
Scoped secrets, zero-knowledge encryption, and per-session credentials. Takes 10 minutes to set up.
No credit card required
Getting Started with API Stronghold
Don’t have an API Stronghold account yet? Start your free trial, add your API keys, create a deployment profile with key exclusions, and create an API user (1 free per org). Then follow this tutorial. Your agent gets what it needs, nothing more.
📚 Related Reading
- Zero-Knowledge Encryption for Enterprise Secrets Management, How client-side encryption protects your keys, even from us
- The Silent Killer of Developer Productivity: Insecure API Key Sharing, Why your team’s Slack-based key sharing is a problem
- Stop Copy-Pasting .env Files, There’s a CLI for That, The CLI tool behind the
evalpattern used here - AWS Secrets Manager vs Dedicated Vaults, Comparing cloud-native vs dedicated approaches